

There’s something deeply satisfying about creating your own beauty products, and lip balm recipe is arguably the most rewarding place to start. The journey from store-bought tubes filled with mysterious ingredients to a homemade lip balm recipe that you’ve crafted with your own hands is not just about saving money—it’s about taking control of what you put on your body. When you make your own lip balm, you know exactly what’s going into it, and you can tailor it to your specific needs, whether that means extra moisture for cracked winter lips or a touch of natural color for a subtle glow. The beauty of crafting your own lip balm lies in its simplicity, yet the possibilities for customization are virtually endless.
Creating your own lip balm recipe opens up a world of creative possibilities that you simply don’t get with commercial products. You can experiment with different butters, oils, and essential oils to find the perfect combination that works for your lips. Plus, homemade lip balm makes wonderful gifts that show you’ve put thought and care into something personal. The process itself is therapeutic, almost meditative, as you melt, mix, and pour your creations. Whether you’re a complete beginner or someone who’s dabbled in DIY beauty before, learning to make your own lip balm is a skill that will serve you well for years to come. It’s sustainable, cost-effective, and infinitely more fun than simply picking up another tube at the drugstore.
Understanding the Basics of Lip Balm Formulation
Before you dive into your first lip balm recipe, it’s essential to understand what makes a great lip balm. The ideal lip balm should glide on smoothly, provide lasting moisture, and create a protective barrier that locks that moisture in. This is achieved through a careful balance of three main components: oils, butters, and waxes. Oils provide the nourishing and moisturizing properties, butters add richness and thickness, while waxes give the balm its structure and help it stay solid at room temperature while melting upon contact with your lips. Getting this balance right is the secret to a successful lip balm recipe that people will actually want to use.
The science behind lip balm is fascinating because your lips are unique compared to the rest of your skin. They don’t have oil glands, which means they can’t produce their own moisture, making them particularly susceptible to drying out. This is why a good lip balm recipe needs to not only add moisture but also create a seal that prevents that moisture from evaporating. The waxes in your recipe act as that seal, while the oils and butters provide the nourishment. Understanding this dynamic will help you troubleshoot if your first batch doesn’t turn out quite right and will give you the confidence to start experimenting with your own variations.
Essential Ingredients for Your Lip Balm Recipe
When you’re starting to develop your lip balm recipe, having a solid foundation of ingredients is crucial. Beeswax is perhaps the most traditional and popular wax choice, and for good reason—it creates a firm structure, has natural antibacterial properties, and adds a subtle honey-like scent that many people love. However, if you’re vegan or simply prefer a plant-based alternative, candelilla wax or carnauba wax work beautifully too. Candelilla wax creates a slightly harder balm that gives a glossy finish, while carnauba wax is even harder and provides a more protective barrier. Each wax will affect the texture and feel of your final product, so it’s worth experimenting to find your preference.
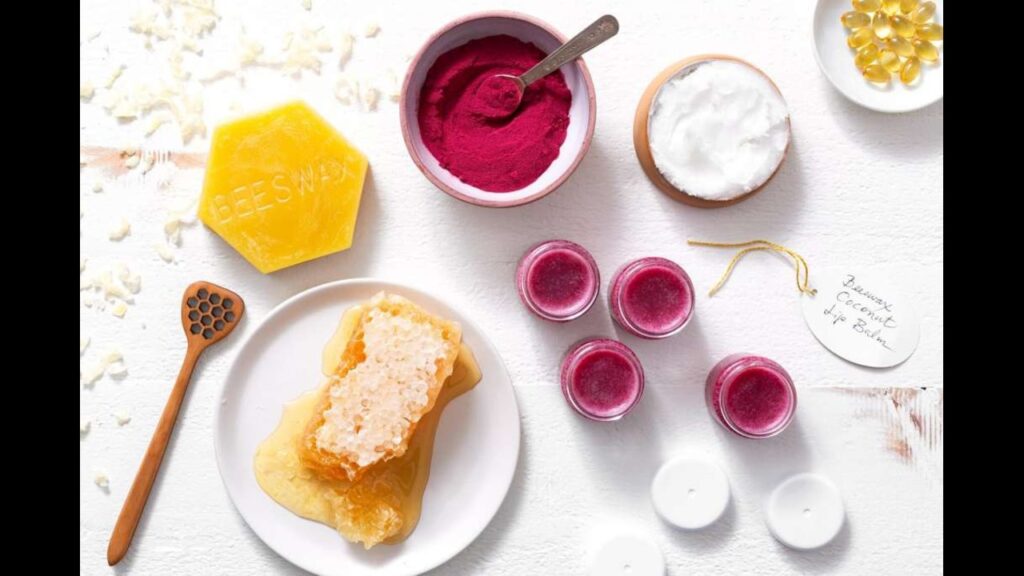
The oils you choose for your lip balm recipe will determine how nourishing and moisturizing your final product is. Coconut oil is a favorite because it’s readily available, has a lovely tropical scent, and solidifies at room temperature, which helps with the balm’s structure. Sweet almond oil is another excellent choice—it’s lightweight, absorbs quickly, and is packed with vitamins. Jojoba oil is particularly interesting because its molecular structure closely mimics the natural sebum your skin produces, making it exceptionally compatible with your lips. Olive oil, while heavier, is rich in antioxidants and works wonderfully in a lip balm recipe designed for severely chapped lips. The key is to choose oils that not only feel good but also provide real benefits to your lips.
The Role of Butters in Your Lip Balm Recipe
Butters are where your lip balm recipe gains its luxury factor and intensive moisturizing power. Shea butter is the superstar of the butter world, packed with vitamins A and E, and it has remarkable healing properties that make it perfect for dry, cracked lips. It melts at body temperature, which means it spreads effortlessly and feels incredibly smooth. Cocoa butter is another fantastic option that adds a subtle chocolate aroma and creates a slightly firmer balm that holds its shape beautifully. Mango butter is a personal favorite because it’s ultra-smooth, has a mild, pleasant scent, and doesn’t leave a greasy feeling.
You can use butters alone or combine them in your lip balm recipe for unique textures and benefits. Some people find that shea butter can feel a bit heavy, so mixing it with a lighter butter like mango or a softer oil can create a more balanced product. The butter content in your recipe will largely determine how thick and creamy your balm feels. A higher butter percentage creates a richer, more emollient balm that’s perfect for nighttime use or for people with chronically dry lips, while a lower butter content yields a lighter, more daytime-friendly product. Finding the right butter combination for your needs is part of the fun of creating your own lip balm.
Oils and Their Benefits in Lip Balm
The oils you incorporate into your lip balm recipe are the workhorses that deliver the actual nourishment to your lips. Different oils bring different benefits, and understanding these can help you create a truly customized product. Apricot kernel oil is light and easily absorbed, making it excellent for a smooth, non-greasy finish. Hemp seed oil is packed with omega fatty acids, which are brilliant for repairing damaged lip tissue. Avocado oil is incredibly rich and penetrating, perfect for those who need serious moisture restoration.
Essential oils play a dual role in your lip balm recipe—they add natural fragrance and flavor while also providing therapeutic benefits. Peppermint essential oil gives that classic tingly sensation and can help plump your lips naturally. Lavender essential oil is soothing and calming, which is lovely for a bedtime lip balm. Citrus essential oils like sweet orange or lemon are uplifting and refreshing. However, it’s important to use essential oils sparingly—they’re potent and can irritate sensitive lips if used in high concentrations. Generally, a few drops per batch of lip balm is all you need to achieve the desired scent and benefits without overwhelming your lips.
Creating Your First Lip Balm Recipe
Now that you understand the components, let’s walk through a basic lip balm recipe that you can easily adapt. A classic ratio for beginners is two parts oil, one part butter, and one part wax. For example, you might use two tablespoons of sweet almond oil, one tablespoon of shea butter, and one tablespoon of beeswax. This ratio typically yields a balm that’s firm enough to hold its shape but melts readily on the lips. Start with this basic formula and note how it feels—is it too hard? Too soft? Too greasy? These observations will guide you as you adjust your future recipes.
The process of making your lip balm is straightforward but requires attention to detail. You’ll need a double boiler or a heat-safe bowl set over a pot of simmering water to gently melt your ingredients without scorching them. Melt the wax and butter together first, as they take longer to liquefy, then stir in your liquid oils. Once everything is melted and well combined, remove from heat and add your essential oils. Pour quickly into your chosen containers before the mixture begins to set. This is the moment where your lip balm recipe comes to life—the aroma, the color, the texture all coming together in a beautiful, personalized creation.
Advanced Lip Balm Recipe Variations
Once you’ve mastered the basic lip balm recipe, the real fun begins with experimentation. You can create different formulations for different seasons or purposes. A winter lip balm recipe might feature more butter and heavier oils like avocado or olive oil to combat harsh, drying cold. A summer version could be lighter, with more liquid oils and less wax to prevent melting in your pocket. Tinted lip balms are another exciting avenue—you can add natural colorants like beetroot powder, hibiscus powder, or cocoa powder to give your balm a subtle flush of color while keeping it natural and chemical-free.
For those with specific concerns, your lip balm recipe can be tailored accordingly. Add vitamin E oil for its antioxidant properties and skin-healing benefits. A few drops of honey can add moisture and natural antimicrobial properties to your lip balm recipe, though it should be used in very small amounts to keep the texture right. Some people love adding a pinch of cinnamon for a mild plumping effect and warming sensation. The key to creating advanced recipes is understanding how each ingredient affects the final product and being willing to adjust your ratios to achieve exactly what you’re looking for.
Common Mistakes in Lip Balm Making
Even experienced makers can encounter issues with their lip balm recipe, but knowing what can go wrong helps you avoid these pitfalls. One of the most common mistakes is using too much wax, which results in a hard, waxy balm that doesn’t spread well and feels like you’re rubbing a candle on your lips. On the flip side, too little wax and you’ll end up with a greasy, unstable mixture that melts in your pocket and separates over time. Finding that sweet spot takes practice, but starting with recommended ratios and adjusting incrementally is the best approach.
Another frequent issue is adding essential oils while the mixture is still too hot, which can cause them to evaporate and lose their potency. Always let your mixture cool slightly before adding essential oils to preserve their fragrance and therapeutic properties. Temperature control throughout the process is crucial—if you overheat your ingredients, you can destroy some of their beneficial properties. This is particularly true for honey or other natural additives that are sensitive to high temperatures. Patience and gentle heat are your best friends when creating a perfect lip balm recipe.
Troubleshooting Your Lip Balm Recipe
When your lip balm recipe doesn’t turn out as expected, don’t get discouraged—it’s all part of the learning process. If your balm is too hard, simply melt it down again and add more oil or a bit less wax to soften the texture. Conversely, if it’s too soft, remelt and incorporate additional wax or butter to firm it up. This ability to adjust your lip balm recipe makes it very forgiving and allows you to perfect your formula over time. Keep notes on what you change each batch so you can replicate your successes and learn from your failures.
Separation is another common issue where the oils separate from the waxes and butters, creating an uneven texture. This usually happens when the ingredients weren’t emulsified properly or when the cooling process was too rapid. To fix this, remelt your lip balm and stir more thoroughly before pouring into containers. Sometimes adding a small amount of lecithin, a natural emulsifier, can help create a more stable lip balm recipe that stays beautifully blended. Remember, every batch teaches you something new about the properties of your ingredients and how they interact with each other.
Natural Additives to Enhance Your Lip Balm Recipe
Taking your lip balm recipe to the next level often involves incorporating natural additives that provide extra benefits. Vitamin E oil is a popular addition because it acts as a natural preservative while also being incredibly nourishing for lips. It helps heal damaged skin and prevents the oils in your lip balm from going rancid, extending the shelf life of your product. A few drops of tea tree oil can add antibacterial properties, though it should be used very sparingly due to its strong scent and potential for irritation.
Herbal infusions offer another dimension to your lip balm recipe. You can infuse your carrier oils with calendula flowers for their soothing, anti-inflammatory properties or with chamomile for its gentle, calming effects. This involves steeping your chosen herbs in your oil for several weeks or gently heating them together to extract the beneficial compounds. The result is a lip balm recipe that not only moisturizes but also delivers targeted herbal benefits. Rosehip seed oil is another wonderful addition that’s packed with vitamins and essential fatty acids that promote skin regeneration and healing.
Packaging Your Homemade Lip Balm
The way you package your lip balm recipe can significantly affect the user experience and the product’s longevity. Small tins are classic, easy to use, and allow you to get every last bit of balm out. However, they can be messy if you’re applying with your fingers, especially on the go. Tubes offer the convenience of direct application without using your fingers, but they can be trickier to fill and may not be as aesthetically pleasing as tins. The choice ultimately depends on your personal preference and how you plan to use your lip balm recipe.
For those who enjoy sharing their creations, custom labels can make your lip balm recipe feel truly professional. You can print simple labels with the ingredients, the date made, and perhaps a fun name for your creation. If you’re giving lip balm as gifts, consider adding a personalized touch like a handwritten note or a ribbon tied around the container. The presentation of your homemade lip balm recipe can be as simple or elaborate as you like, and it adds an extra layer of thoughtfulness that recipients will appreciate.
Storing and Preserving Your Lip Balm
Proper storage is essential for maintaining the quality and effectiveness of your lip balm recipe. Since you’re not using commercial preservatives, your homemade lip balm will have a shorter shelf life, typically around six months to a year if stored correctly. The key is to keep your lip balm in a cool, dark place away from direct sunlight and heat sources. A drawer or cupboard works perfectly. Heat can cause the oils to go rancid more quickly and can also melt the wax, ruining the texture of your lip balm.
You can extend the shelf life of your lip balm recipe by adding vitamin E oil, which acts as a natural antioxidant. Also, using fresh, high-quality ingredients and ensuring your containers and utensils are completely clean and dry before use will minimize the risk of contamination. Pay attention to any changes in smell, texture, or color—if your lip balm starts to smell odd or rancid, it’s time to make a fresh batch. While it’s tempting to hoard your beautiful creations, homemade lip balm is best used fresh, so consider making smaller batches that you can enjoy while they’re at their peak.
Seasonal Adjustments to Your Lip Balm Recipe
Your lip balm recipe should evolve with the seasons to provide the best protection and care for your lips throughout the year. During winter months, when cold air and indoor heating create a double drying effect, your balm needs to be richer and more protective. Increase the butter content in your lip balm recipe and use heavier oils like avocado or olive oil to create a thicker barrier. Consider adding a bit more wax as well to prevent the balm from getting too soft in warm pockets and to ensure it stays put on your lips in the cold.
In summer, your lip balm recipe should be lighter to avoid a greasy feel when it’s hot and humid. Reduce the butter and wax slightly and increase the proportion of lighter oils like jojoba or sunflower oil. You might also want to add natural SPF protection by incorporating ingredients like carrot seed oil or red raspberry seed oil, which offer some natural sun protection. Pay attention to how your lips feel in different weather conditions and adjust your lip balm recipe accordingly. Your lips are unique, and what works perfectly in one season might not be ideal in another.
Ethical Considerations in Lip Balm Making
When you create your own lip balm recipe, you have the power to make ethical choices that align with your values. Opting for sustainably sourced ingredients, like fair-trade shea butter or organic beeswax from responsible beekeepers, ensures that your lip balm is good not just for your lips but for the planet and its people. Many people find peace of mind in knowing exactly where their ingredients come from and that their lip balm recipe isn’t contributing to environmental harm or exploitation.
The zero-waste movement has also embraced homemade lip balm as a way to reduce plastic consumption. By using refillable tins or glass containers, you’re avoiding the single-use plastic that’s common in commercial lip balm packaging. Some creative makers even use cardboard tubes or biodegradable materials for their lip balm recipe packaging. This environmental consciousness adds another layer of satisfaction to your lip balm-making journey. Your homemade lip balm recipe can be a small but meaningful step towards a more sustainable lifestyle.
Health and Safety in Lip Balm Making
When crafting your lip balm recipe, safety should always be a priority. Allergens are a particular concern, so if you’re making lip balm for others, be sure to clearly label all ingredients. Common allergens like nuts (almond oil, shea butter) and coconut can be problematic for some people. Consider creating a nut-free version of your lip balm recipe using sunflower oil or olive oil as alternatives. It’s also wise to test a small amount of any new lip balm on a patch of skin before widespread use to check for adverse reactions.
Hygiene is another critical aspect of lip balm making. Always work with clean hands, sterilize your containers and utensils, and avoid touching the mixture directly. If you plan to sell your lip balm recipe, you’ll need to follow strict regulations regarding labeling, batch numbers, and safety assessments. Even for personal use, being mindful of cleanliness ensures your lip balm remains free from harmful bacteria and stays fresh longer. Remember, you’re making something that will be applied to a sensitive area of the body, so taking these precautions is non-negotiable.
The Cost Savings of Homemade Lip Balm
One of the most compelling reasons to develop your own lip balm recipe is the significant cost savings. While the initial investment in ingredients might seem like a lot, the cost per tube or tin of homemade lip balm is dramatically lower than commercial products. A good quality natural lip balm from a store can easily cost ten dollars or more for a tiny tube, while your homemade lip balm recipe will cost just a fraction of that per batch. Plus, you have the added benefit of knowing that what you’re putting on your lips is free from unnecessary fillers and synthetic ingredients.
As you get more comfortable with your lip balm recipe, you can buy ingredients in bulk to save even more money. Many suppliers offer discounts for larger quantities, and since lip balm ingredients have a good shelf life when stored properly, it makes financial sense to stock up. You might find yourself making lip balm not just for yourself but also for family and friends, further spreading the cost savings while sharing the joy of handmade, natural products. The financial aspect of making your own lip balm is just one of the many benefits that make this hobby so rewarding.
Customizing Your Lip Balm Recipe for Different Needs
Everyone’s lips are different, and your lip balm recipe can be customized to address specific concerns or preferences. For severely chapped lips that crack and peel, a medicated-style balm with ingredients like calendula oil, vitamin E, and a touch of honey can work wonders. For those who live in dry climates or spend a lot of time in air-conditioned environments, a lip balm recipe with hyaluronic acid or glycerin can help draw moisture to the lips. If you have sensitive skin, avoid essential oils and strong fragrances, opting instead for unscented, gentle ingredients.
You might also want to create different lip balm recipes for different times of day. A daytime lip balm recipe could be lighter with a hint of SPF protection, while a nighttime version could be thicker and more intensive, acting like a lip mask overnight. Morning lip balms might have a touch of peppermint or citrus to wake you up, while evening balms could feature calming lavender or chamomile. The ability to create exactly what you need, when you need it, is one of the most empowering aspects of making your own lip balm.
Combining Your Lip Balm Recipe with Other DIY Products
Once you’ve perfected your lip balm recipe, you might find yourself drawn to making other skincare products. The skills you learn from making lip balm easily transfer to creating homemade lotions, body butters, and salves. Many of the same ingredients—shea butter, coconut oil, beeswax—are used across various DIY skincare recipes. Your experience with lip balm will give you a solid foundation for understanding ratios, melting temperatures, and ingredient properties that will serve you well in other projects.
Creating a full line of natural body care products is a natural progression for many lip balm enthusiasts. You could make matching body butter, solid perfume, or even natural sunscreen using similar techniques and ingredients. The satisfaction of having a complete bathroom shelf filled with products you’ve made yourself is immeasurable. Plus, these make incredible gift sets that combine beautifully with your lip balm recipe. Imagine giving someone a curated collection of handmade skincare—it’s thoughtful, practical, and deeply personal.
The Sensory Experience of Homemade Lip Balm
There’s something profoundly satisfying about the sensory aspects of making your own lip balm recipe. The process begins with the visual—the rich, golden colors of the oils and butters, the glossy shine as they melt together. Then comes the aroma, whether it’s the natural scent of beeswax and cocoa butter or the intentional fragrance you’ve added with essential oils. The texture is another crucial element—the smooth glide as you apply the balm, the way it melts on contact with your lips, the protective layer that feels comforting and nourishing.
These sensory experiences are often missing from commercial products, which can feel clinical and impersonal. Your homemade lip balm recipe engages your senses in a way that’s deeply connected to the act of creation. You know the effort that went into selecting the right oils, the care taken in melting and mixing, the anticipation as you watch the balm set in its containers. This connection to your product enhances the pleasure of using it and makes every application a reminder of your creativity and resourcefulness.
Sharing Your Lip Balm Recipe with Others
One of the greatest joys of mastering your lip balm recipe is sharing it with others. Making lip balm for friends and family is a wonderful way to show you care, and it’s a gift that keeps on giving—every time they use it, they’ll think of you. Hosting a lip balm-making party can be a fun and creative way to spend time with friends while everyone crafts their own personalized blend. You provide the base ingredients, and everyone can customize with different essential oils and colors.
Sharing your lip balm recipe online through blogs, social media, or even local workshops can also be incredibly rewarding. There’s a vibrant community of DIY skincare enthusiasts who love learning from each other and sharing their innovations. Your lip balm recipe might be the inspiration someone needs to start their own skincare journey, and the connections you make through sharing your knowledge can be unexpectedly meaningful. Whether you’re gifting lip balm to one person or teaching a class of twenty, the act of sharing your creations spreads joy and builds community.
Conclusion and Final Thoughts on Your Lip Balm Journey
Embarking on the journey of creating your own lip balm recipe is more than just a practical skill—it’s a gateway to a more mindful, intentional approach to personal care. As you’ve learned, the process involves understanding ingredients, balancing formulas, and creating something uniquely suited to your needs. There’s a profound satisfaction that comes from using a product you’ve made yourself, knowing exactly what’s in it and why. Your lip balm recipe will evolve as you do, changing with seasons, moods, and life circumstances.
This journey is also a reminder that the best things in life are often the simplest. A well-crafted lip balm recipe combines basic, natural ingredients into something that protects and nurtures your lips in a way that commercial products often fail to achieve. As you continue to experiment and refine your recipes, you’ll develop an intuitive understanding of what makes a great lip balm. You’ll also discover that the process itself—the measuring, melting, and pouring—is a form of self-care, a moment of creativity in your day that feeds your soul as much as the balm feeds your lips. So embrace your role as a lip balm maker, and enjoy the sweet, satisfying results of your efforts.