
We have all been there. You Excel AutoFit inherit a messy spreadsheet, or you paste data into a worksheet, only to find half the content missing. Columns are narrow, text is cut off, and hash marks (#######) glare at you. You start dragging column borders, guessing widths, and soon realize you’ve wasted ten minutes. This is the classic Excel AutoFit dilemma: the need for a reliable way to resize.
Enter Excel AutoFit, the unsung hero of spreadsheet formatting. This built-in feature elevates your worksheet from amateur to professional. AutoFit resizes columns or rows to fit your longest or tallest content. Whether you’re a data analyst or a student, mastering this tool is essential. It isn’t just for aesthetics; it’s about clarity, readability, and effective communication.
In this comprehensive guide, we delve into the world of Excel AutoFit. We will explore every method available to you, from the simple double-click to advanced VBA scripts that automate the process. We’ll also tackle the frustrating moments when AutoFit doesn’t seem to work and show you exactly how to fix them. By the end, you won’t just be using Excel; you’ll be commanding it to format itself exactly the way you want.
What is Excel AutoFit and Why Should You Care?
At its core, Excel AutoFit is a formatting command that tells Excel AutoFit to read the contents of a cell and expand the column or row housing it just enough to display that content fully. If you have a column with names like “Smith” and “Christopherson,” a standard column width might show “Smith” fine, but “Christopherson” will be truncated. Applying Excel AutoFit to that column will widen it so that “Christopherson” (the longest string) is completely visible https://www.e-iceblue.com/en/xls/autofit-column-width-in-excel.html.
This feature isn’t just about columns. It applies to rows as well. When you have wrapped text or multiple lines in a cell (using Alt + Enter), the content might be visible horizontally but cut off vertically. Excel AutoFit row height ensures that every line of text within the cell is displayed, expanding the row downward to accommodate the content https://www.thebricks.com/resources/how-to-auto-fit-on-excel.
Why should you care? Because readability directly impacts decision-making. A study by the Data Literacy Project suggests that poor data organization leads to misinterpretation and lost productivity. When you use Excel AutoFit, you eliminate guesswork. You don’t have to hover over a cell to read the full text in the formula bar; you can see it right there in the grid. It makes your worksheets print, present, and feel more professional. It takes a grid of raw data and transforms it into a polished table worthy of a boardroom presentation.
The Quick and Easy Way: Using the Mouse for Excel AutoFit
The most intuitive method for resizing is also the fastest. If you are working on a spreadsheet and spot a column that is too narrow, your mouse is your best friend. This method is perfect for those quick, on-the-fly adjustments that keep your workflow moving without interruption.
The Single Double-Click Trick
This is arguably the most famous trick in the Excel user manual. To perform an Excel AutoFit on a single column, simply move your cursor to the header area. Hover over the right boundary line of the column you want to adjust (for example, the line between column A and column B). Your cursor will change from a white plus sign into a double-headed arrow pointing left and right. When you see that arrow, double-click your left mouse button. Instantly, the column snaps to the width of the longest cell content within that column https://www.thebricks.com/resources/how-to-autofit-in-excel-using-ai.
The same principle applies to rows. Hover over the bottom boundary of a row header (between row 1 and row 2) until you get a vertical double-headed arrow, and double-click. The row height will expand to fit the tallest content in that row. It’s so simple and satisfying that once you start using it, you’ll wonder how you ever lived without it.
Excel AutoFit Multiple Columns at Once
Here is where the mouse method becomes a true powerhouse. You do not have to double-click every single column individually. If you have a dataset that spans from column A to column M, and they all need adjusting, you can do them all in one go. Excel AutoFit
Simply click and drag your mouse across the column letters (A through M) to highlight them. Alternatively, you can select the first column, hold down the Shift key, and select the last column. With all the desired columns selected, move your cursor to the boundary line between any two of the selected column headers (say, between D and E) until you see the double-headed arrow. Double-click. Excel AutoFit will simultaneously resize every single selected column to fit its own content https://open.baypath.edu/com112/chapter/kp-1-4a/#content. This is a massive time-saver and is often the best method when formatting a freshly pasted dataset.
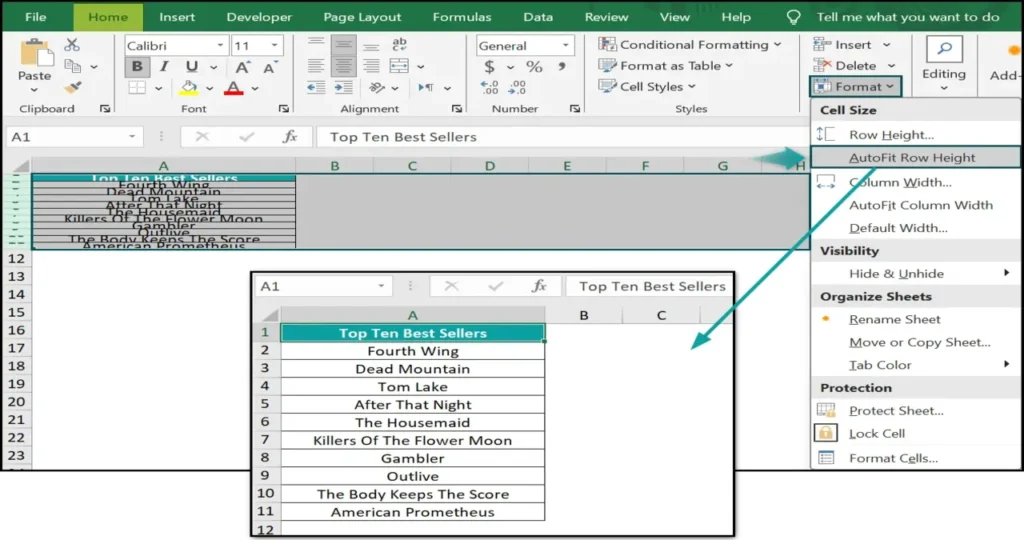
Precision Formatting: Using the Ribbon to Excel Excel AutoFit
While the mouse is fast, some users prefer the deliberate control of the Ribbon menu. This method is especially useful if you are less comfortable with mouse shortcuts or if you want to explore related formatting options. The Ribbon provides a clear, visual path to the commands you need.
The process is straightforward. First, select the columns or rows you want to adjust. You can select a single column by clicking its letter, or select the entire worksheet by clicking the small triangle in the top-left corner where the row numbers and column letters meet. Once your selection is made, navigate to the “Home” tab on the Ribbon. Look for the “Cells” group, which is usually located on the far-right side. Click the “Format” dropdown button. A menu will appear with visibility, organization, and size options. Under the “Cell Size” section, you will see two distinct commands: Excel AutoFit Column Width and Excel AutoFit Row Height https://www.thebricks.com/resources/how-to-auto-fit-on-excel.
Clicking one of these commands applies the exact same logic as the double-click method, but it feels more formal. This method is also handy when you are dealing with merged cells or specific ranges, as you can ensure you are applying the formatting to the exact selection you intend, rather than accidentally hitting the wrong border with your mouse.
For the Speed Demons: Excel AutoFit Keyboard Shortcuts
If you want to look like a true Excel AutoFit wizard, you need to memorize the keyboard shortcuts. Keeping your hands on the keyboard rather than reaching for the mouse can dramatically speed up your data processing. Excel AutoFit uses a sequential shortcut system for formatting that is easy to learn.
For Windows users, the magic sequence for columns is Excel AutoFit. You don’t press these all at once. Press Alt and H together to access the Home tab, then press O (for Format), and then I (for AutoFit Column Width). It sounds complicated, but muscle memory takes over quickly. For rows, the sequence is Alt + H, O, A https://www.thebricks.com/resources/how-to-autofit-in-excel-using-aihttps://www.thebricks.com/resources/how-to-auto-fit-on-excel.
Mac users have a slightly different, but equally fast, set of shortcuts. To AutoFit column width on a Mac, select your columns and press Command + Option + 0 (zero). For row height, the shortcut is Command + Option + Shift + 0 https://www.e-iceblue.com/en/xls/autofit-column-width-in-excel.html. These shortcuts are the epitome of efficiency. Once you incorporate them into your workflow, you can clean up the formatting of an entire spreadsheet in seconds without ever lifting your fingers from the keyboard.
Smart Automation: Using VBA to AutoFit on the Fly
Sometimes, you want Excel to be proactive. You don’t want to have to run a shortcut every time you update a cell. You want the spreadsheet to just know how to format itself. This is where Visual Basic for Applications (VBA) comes into play. VBA allows you to write small scripts, or macros, that automate repetitive tasks. With a few lines of code, you can make Excel AutoFit a dynamic, real-time feature https://www.thebricks.com/resources/how-to-autofit-in-excel-using-ai.
Imagine you have a dashboard where users input data. You want the columns to widen automatically as they type, ensuring they can always see their full entry. This is achievable with an event-driven macro.
Here is a simple yet powerful VBA script that automatically resizes a column whenever a change is made to a cell within it:
- Press Alt + F11 to open the VBA editor.
- In the Project Explorer, find your sheet (e.g., Sheet1) and double-click it.
- Paste the following code into the code window:
vba
Private Sub Worksheet_Change(ByVal Target As Range) 'This prevents errors if someone pastes multiple cells at once If Target.Cells.CountLarge > 1 Then Exit Sub 'Check if the cell is not empty. If Target.Value <> "" Then 'AutoFit the entire column for the changed cell. Target.EntireColumn.AutoFit End IfEnd Sub
- Close the editor and save your workbook as a Macro-Enabled Workbook (*.xlsm).
Now, whenever you type something new into a cell and hit enter, the entire column instantly resizes to accommodate it https://www.thebricks.com/resources/how-to-autofit-in-excel-using-ai. You can modify this code to affect only specific ranges, like Columns(“A:D”), to prevent the entire sheet from constantly shifting. This turns Excel AutoFit from a manual chore into a “smart” background process.
Beyond Excel: Python and Third-Party Tools
For data scientists and analysts working with large datasets, opening Excel to manually resize columns isn’t always feasible. Sometimes, you are generating reports programmatically. In these cases, libraries like Spire.XLS for Python allow you to apply Excel AutoFit logic without ever launching the application.
With a simple Python script, you can load a workbook, select a worksheet, and apply auto-fitting to the entire range. This is incredibly useful for automating report generation where the data length varies each time. You ensure that the output file is always readable and print-ready before it is even sent to a client https://www.e-iceblue.com/en/xls/autofit-column-width-in-excel.html.
Furthermore, the landscape of data presentation is evolving. New AI-powered tools like Bricks are taking the concept of AutoFit to a holistic level. Instead of just resizing cells, these platforms analyze your entire dataset to generate complete, interactive dashboards. They intelligently decide on chart types, color schemes, and layouts, effectively automating the entire design process that goes beyond simply fitting text into a cell https://www.thebricks.com/resources/how-to-autofit-in-excel-using-aihttps://www.thebricks.com/resources/how-to-auto-fit-on-excel. While AutoFit handles the micro-formatting, these tools handle the macro-presentation.
Troubleshooting: Why AutoFit Might Be Failing You
Excel AutoFit is reliable, but it isn’t infallible. There are moments when you double-click that border and… nothing happens. Or the column expands but leaves awkward space. These issues are almost always traceable to a few common culprits. Understanding these will save you from a lot of frustration.
The Merged Cells Menace
The most common reason AutoFit fails is the presence of merged cells. When you merge several cells together to create one large cell, you create a unique object that spans multiple columns. Excel gets confused because it doesn’t know which column’s width to base the calculation on. Consequently, the Excel AutoFit command simply ignores merged cells https://www.e-iceblue.com/en/xls/autofit-column-width-in-excel.htmlhttps://www.thebricks.com/resources/how-to-auto-fit-on-excel.
The solution? If you need the visual effect of merging (like for a title over a dataset), consider using “Center Across Selection” instead. Select your cells, right-click, go to Format Cells, Alignment, and under Horizontal, choose “Center Across Selection.” This looks like merging, but doesn’t break the column structure. If you must use merged cells, you will have to resize them manually.
Font and Print Driver Conflicts
Did you know that the font you choose can break AutoFit? This is a rare but documented issue, particularly with non-standard or corporate-specific fonts. Excel relies on font metrics to calculate how wide a column needs to be. If there is a mismatch between the screen font and the printer font, or if the font file itself is corrupted, AutoFit might calculate the width incorrectly, often making it slightly too small https://learn.microsoft.com/en-us/answers/questions/ee8d314c-c125-427f-95b5-46be86dfb4d8/excels-column-auto-fit-fails-in-latest-install?forum=msoffice-all&referrer=answershttps://learn.microsoft.com/en-us/answers/questions/4800125/why-doesnt-auto-fit-work?orderby=oldest&page=1#answers.
If you suspect a font issue, try switching the cell font to a standard one like Arial or Calibri and testing the AutoFit again. Updating your printer drivers and ensuring your version of Office is up to date can also resolve these measurement discrepancies, as updates often include font rendering fixes https://learn.microsoft.com/en-us/answers/questions/ee8d314c-c125-427f-95b5-46be86dfb4d8/excels-column-auto-fit-fails-in-latest-install?forum=msoffice-all&referrer=answers.
Wrapped Text and Manual Heights
Another common point of confusion is the interaction between wrapped text and row height. If you have a cell with “Wrap Text” enabled, the text spreads vertically. If you then try to AutoFit the column width, it might not do much because the limiting factor is the height, not the width. However, if someone has previously manually dragged the row height to a specific size, Excel’s AutoFit row height will be overridden. Excel respects manual formatting over automatic suggestions. To fix this, you must select the row, go to the Format menu, and explicitly choose “AutoFit Row Height” to force Excel to recalculate based on the content https://learn.microsoft.com/en-us/answers/questions/4796864/autofit-row-height-doesnt-work?orderby=helpful&page=5#answershttps://learn.microsoft.com/en-us/answers/questions/4800125/why-doesnt-auto-fit-work?orderby=oldest&page=1#answers.
Hidden Characters and Spaces
Sometimes, a cell looks empty but contains a space character. This invisible space is still present in Excel. If you have a column full of data and one blank cell at the top with a space in it, AutoFit might set the column width to fit that space, making it look like the column isn’t adjusting to your actual data. Always check for extra spaces, line breaks (Alt + Enter), and non-printing characters if AutoFit gives you unexpected results https://www.thebricks.com/resources/how-to-auto-fit-on-excel.
Comparison of AutoFit Methods
To help you decide which tool to use for the job, here is a quick comparison of the primary methods we’ve discussed. Each has its place in a well-rounded Excel skillset.
| Mouse Double-Click | Quick adjustments to one or a few columns/rows while browsing data. | Very Fast | None (Intuitive) |
| Ribbon Menu | Applying formatting deliberately to a specific range or the entire sheet. | Moderate | Low |
| Keyboard Shortcuts | Power users who want to format large datasets without lifting their hands. | Fastest | Moderate (Requires memorization) |
| VBA Macros | Automating the process for recurring reports or dynamic dashboards. | Automated | High (Requires coding) |
| Python Scripts | Batch processing of multiple Excel files without opening the application. | Automated | High (Requires coding) |
Conclusion
Mastering Excel AutoFit is one of those small skills that yields massive dividends in productivity. It transforms a chaotic wall of truncated data into a clean, accessible, and professional worksheet. Whether you choose the satisfying snap of the double-click, the precision of the Ribbon, the lightning speed of keyboard shortcuts, or the automated intelligence of VBA, you now have a complete toolkit at your disposal. The next time you open a spreadsheet and see those dreaded hash marks, don’t reach for the mouse to drag and guess. Use the right AutoFit method, get the perfect fit instantly, and get back to the more important work of analyzing your data.
Frequently Asked Questions
Can I AutoFit both rows and columns at the same time?
Yes, you can. First, select the entire area you want to format. You can press Ctrl + A to select the whole sheet. Then, go to the Home tab, click the Format dropdown in the Cells group, and choose AutoFit Column Width. You will need to repeat the process by going back to the Format dropdown and selecting AutoFit Row Height https://www.e-iceblue.com/en/xls/autofit-column-width-in-excel.html. There isn’t a single button for both, but doing them back-to-back takes only a second.
Why doesn’t Excel AutoFit work with my wrapped text?
Excel AutoFit works perfectly with wrapped text, but you need to use the right command. If you have text wrapping on, adjusting the column width will change how the text wraps. To see all the lines of your wrapped text, you must use the AutoFit Row Height command. This tells Excel to expand the row vertically until all the text lines are visible https://www.thebricks.com/resources/how-to-auto-fit-on-excel.
Is there a way to stop Excel from AutoFitting every time I change data?
If you have implemented a VBA macro that runs on every change (like the one in this guide) and you find it annoying, you need to disable or remove the macro. Go back to the VBA editor (Alt + F11), find the code in the sheet module, and either delete it or comment it out by putting an apostrophe (‘) at the start of each line. If you want to keep the macro but temporarily disable it, you can set Application.EnableEvents = False in the Immediate Window, but be careful, as this turns off all events.
My columns are AutoFitting too wide, leaving a lot of blank space. Why?
This usually happens because there is a long string of text without spaces (like a URL or a long ID number) or a large number formatted with a lot of decimals somewhere in the column, even if it’s in a hidden row. Scan your column for unusually long entries. Also, check for cells that have repeated spaces or characters that are forcing the width. If the problem persists, copy the data to a new sheet and use “Paste Special -> Values” to ensure there is no hidden formatting https://learn.microsoft.com/en-us/answers/questions/5095022/excel-365-auto-fit-column-width-more-than-expected?forum=msoffice-all&referrer=answers.
Does AutoFit work on hidden columns?
No, generally, Excel AutoFit will not resize columns that are hidden. If you have hidden columns selected as part of a larger range, the AutoFit command will ignore them. To resize hidden columns, you must first unhide them. After applying AutoFit, you can re-hide them if necessary.